Showing posts with label System-Related. Show all posts

Wednesday, January 25, 2023

Copy Folders and Subfolders Using Xcopy Command

 Copy Folders and Subfolders Using Xcopy Command

1. copy folders and subfolders and contents

1. Click Start and type cmd in the search box. Right-click Command Prompt from the result list and select Run as administrator. Or you can press Win + R to call up Run window, and type "cmd" in the textbox to directly run it.

2. Now, when you're in the Command Prompt, you can type Xcopy command as below to copy folders and subfolders including contents. For example, you want to copy “test” folder and its subfolders on C drive to D drive, type Xcopy command as:

Xcopy C:\test D:\test /E /H /C /I
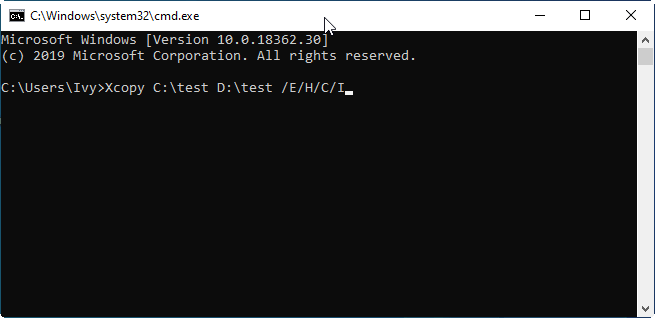
Xcopy Command

  • /E – Copy subdirectories, including any empty ones.

  • /H - Copy files with hidden and system file attributes.

  • /C - Continue copying even if an error occurs.

  • /I - If in doubt, always assume the destination is a folder. e.g. when the destination does not exist.

Notes:

  • Xcopy will not copy open files.

  • Xcopy doesn’t display any progress or completed operations information when executed.

  • Remember that for folders with spaces in the name or folders larger than 8 characters in length, it is a good idea to put quotation marks around the path or you may get an error.

Situation 2. copy folders and subfolders without files

You can open the Command Prompt according to the steps shown above. Then, type the Xcopy command as below to copy folders and subfolders without files:

Xcopy Source Destination /T /E

  • /T - Copy the subdirectory structure, but not the files.

  • /E - Copy subdirectories, including any empty ones.

Situation 3. copy folders and subfolders with NTFS and Share permission

Sometimes, you may need to transfer the NTFS and Share permission together with your folders.

Once the Command Prompt is open, you can then type the following Xcopy command to copy all files and folders and retain its NTFS and Share permissions.

Xcopy Source Destination /O /X /E /H /K

  • /E - Copy folders and subfolders, including empty ones.

  • /H - Copy hidden and system files also.

  • /K - Copy attributes. Typically, Xcopy resets read-only attributes.

  • /O - Copy file ownership and ACL information.

  • /X - Copy file audit settings (implies /O).

Actually, there are many parameters of Xcopy command, and you can combine different parameters for different situations. But if there is a slight error in the command, the copy operation may fail, and even lead to data loss. Therefore, you must be very careful when using Xcopy command.

Troubleshoot no “Switch User” option in Windows 10/11?

Troubleshoot no “Switch User” option in Windows 10/11?

First Method:- Configure Windows Group Policy

  1. Press the Windows Key and R simultaneously, type in or paste “msc” (no quotes) in the Run dialog box and hit Enter.
  2. The Local Group Policy window should appear next. Follow this path:

Computer Configuration > Administrative Templates > System > Logon

  1. Double-click “Hide Entry Points for Fast User Switching” to open it.
  2. Select Disabled to turn it on.
  3. Click Apply > OK.
  4. Exit the Local Group Policy Editor window and check if the Switch User option is back.

2nd Method:- Edit the Windows Registry

Keep in mind that applying changes to the Windows Registry can be risky. Therefore, follow the steps below carefully and only make the changes as outlined. We recommend that you first create a backup of your registry to make it easy to restore it in case something goes wrong.

Backing up your registry on Windows 10/11 is quite simple. Here’s the guide:

  1. Go to your Start menu, type in “regedit” (no quotes), and press Enter.
  2. Right-click the first option – Registry Editor – and select Run as administrator.
  3. Click Yes when you get the system prompt.
  4. Select File > Export and pick the location where you want to save the backup file.
  5. Assign the file a name, and make sure to select the All option under Export Range.
  6. Click on Save.

Once you’re done, here’s how to enable another user in Windows 10/11 through the registry:

  1. Launch the Registry window once again and expand the following path:

Computer\\HKEY_LOCAL_MACHINE\\SOFTWARE\\Microsoft\\Windows\\CurrentVersion\\Policies\\System

  1. Once you get to this location, search for a value labeled “HideFastUserSwitching”. If it doesn’t exist, you can quickly create one. To do so, right-click the System folder and select New > DWORD (32-bit) Value. Type the name “HideFastUserSwitching” (no quotes) and press Enter. This will create the value.
  2. Next, double-click the HideFastUserSwitching value and set the Value Data to 0 (zero) to enable it.

That should do it. Now, press the Windows logo on your keyboard and click on your user icon to check if this fix resolved the no Switch User option in your Windows 10/11 computer.


Monday, June 10, 2019

System Won't turn Off window 10

Hi Guys,

This is first method which one we are going to tell you, if not resolve from this method please write to us so we will give you more solution on it.

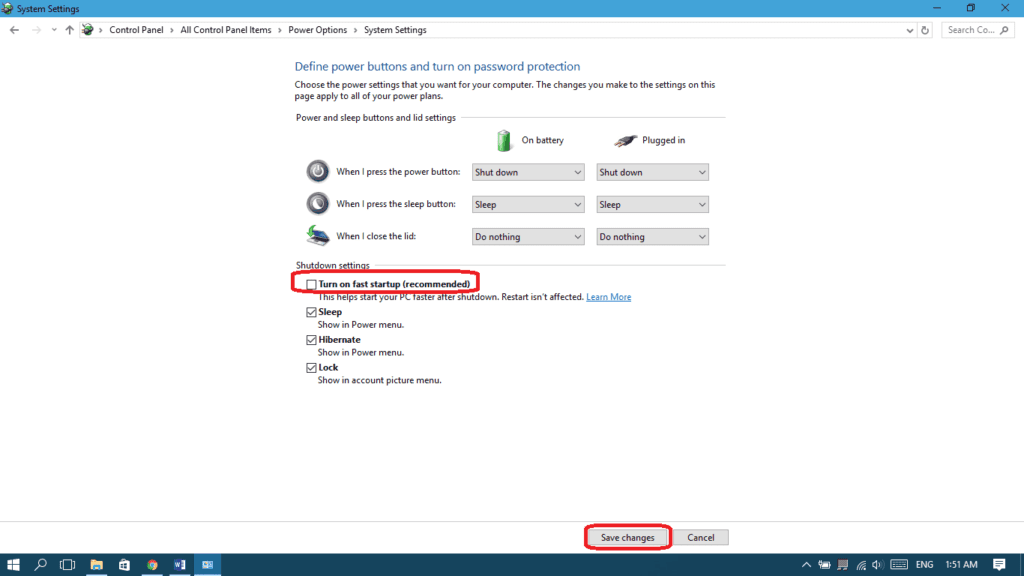
First method is Disable Fast Startup.


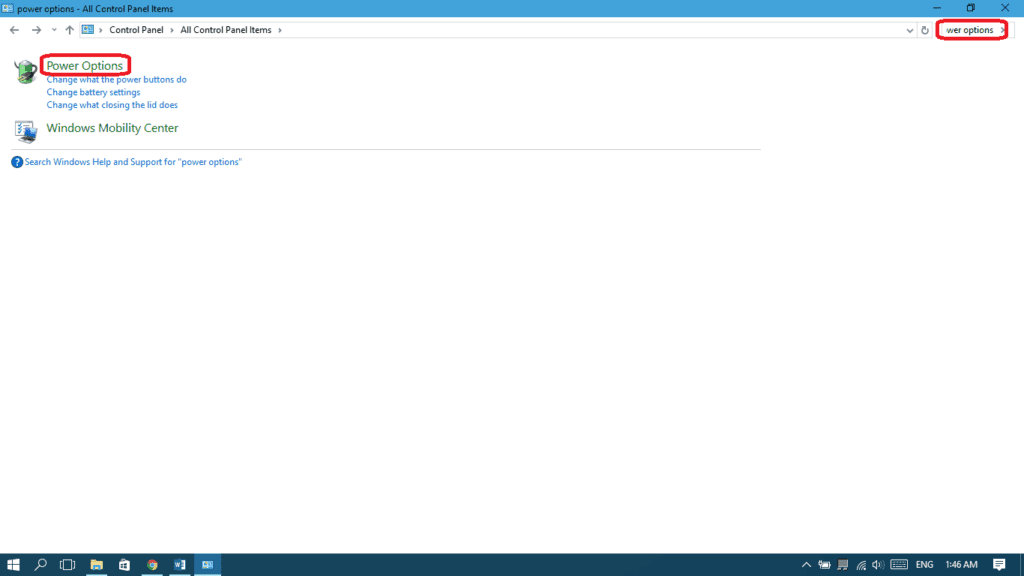
* Open “control panel” and search for “power options” and choose Power Options.

disable fast startup


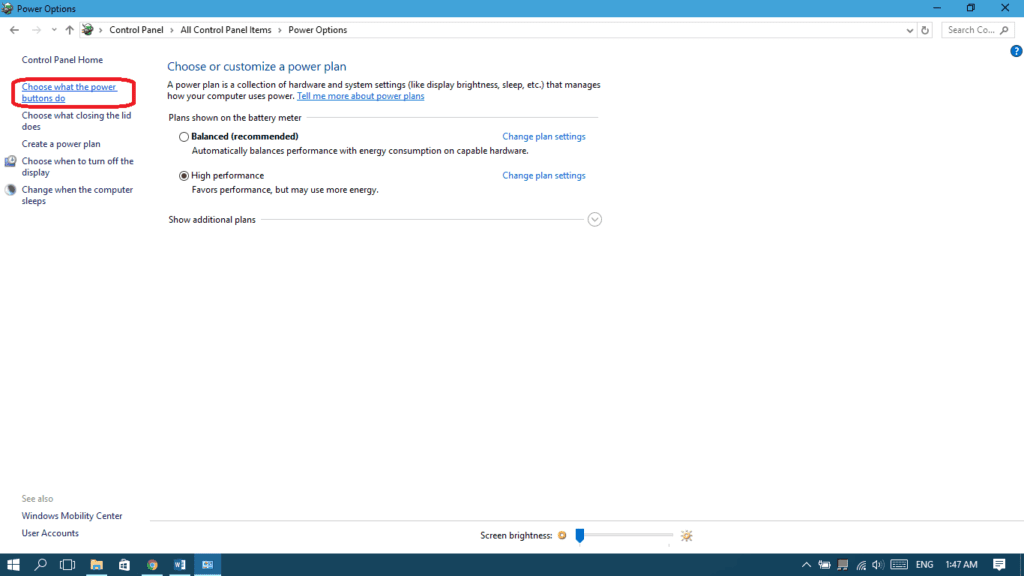
* From the left pane, choose “Choose what the power button does

power button option


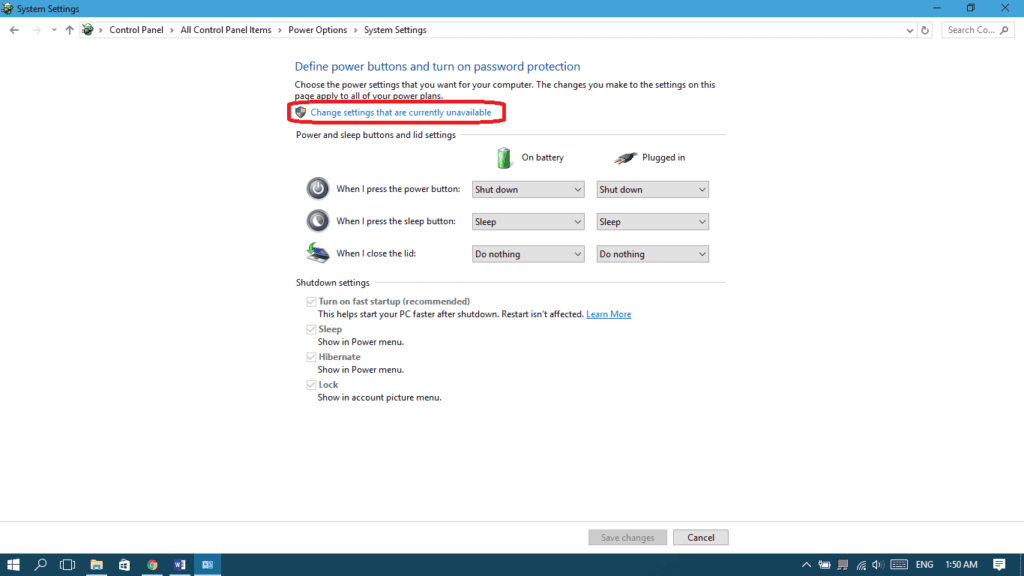
* Choose “Change settings that are currently unavailable”.

 change settings currently unavailable


* Uncheck “Turn on fast startup” and then select “Save changes”.

turn on fast startup and save changes


* And lastly changed what the power key will do when I press the power key.


Tuesday, January 22, 2019

Deleting Folders With ‘Long Filenames'

Deleting Folders With ‘Long Filenames’ (Source Path Too Long)

https://www.petenetlive.com/wp-content/uploads/2018/02/001-Source-Path-Too-Long.png
Source Path Too Long
The source file name(s) are larger than is supported by the file system. Try moving to a location which has a shorter path name, or try renaming to shorter name(s) before attempting this operation.

Solution

The most difficult part was replicating the script. Windows is pretty good at protecting itself. But thanks to the good folk at Experts-Exchange’s assistance, I was good to go, attempting to move or delete the file generated the error you see above.

Method One: Use Robocopy

Robocopy has been built into windows for a while, you can use it with the /MIR flag to remove all your subfolders.
 
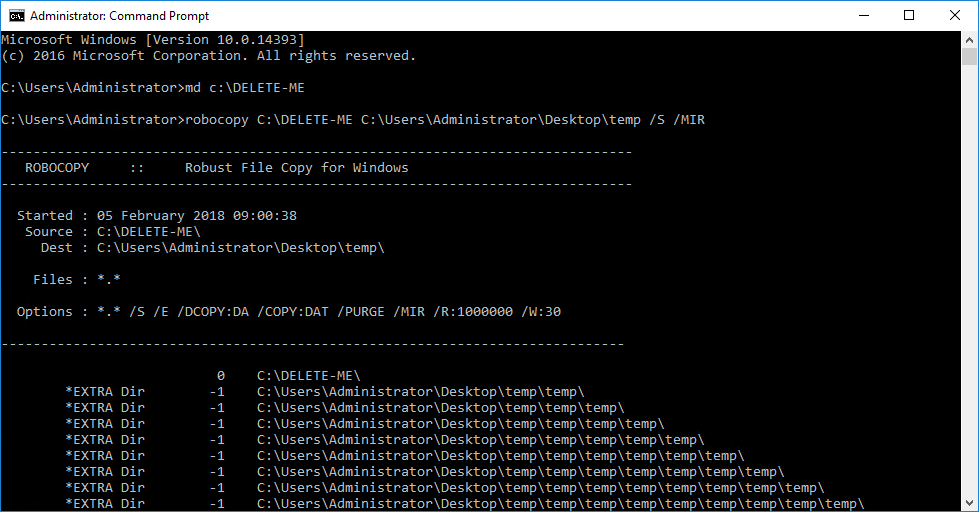
MD C:\DELETE-ME
robocopy C:\DELETE-ME C:\{path}\{The Top Level Folder To Delete} /s /mir

https://www.petenetlive.com/wp-content/uploads/2018/02/002-Cannot-delete-path-too-long.png 


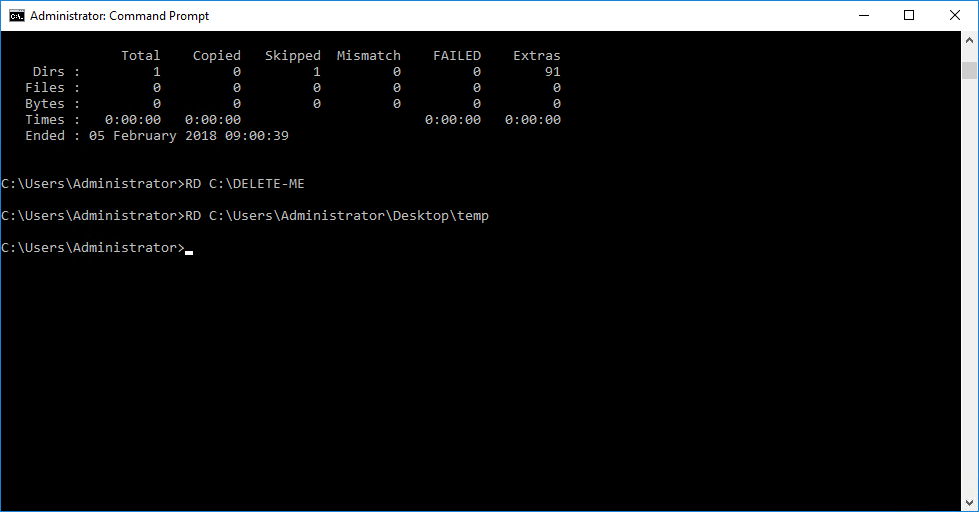
Then you can simply delete the two remaining empty folders

rd C:\DELETE-ME
rd C:\{path}\{The Top Level Folder To Delete}

https://www.petenetlive.com/wp-content/uploads/2018/02/003-Delete-Long-File-Path.png

Finish!