Sunday, November 11, 2018

Bookmark not showing after import from another browser


Hi Guys,
I hope you all doing great!


Today we are going to discussed about Mozilla Firefox bookmark not showing after importing from another browser or so on.

Solution is very simple for resolve this just follow my instruction.

1. Closed Mozilla Firefox from each & everywhere.

2. Follow this path  C:\Users\User Profile\AppData\Roaming\Mozilla\Firefox\Profiles\places.sqlite
   and find this file & delete it. (Also you can try to search this places.sqlite file in the system)

3. And now open the Mozilla Firefox and check .

Resolved!

Monday, November 5, 2018

Routing Protocol Administrator distance

Routing protocol administrator distance is help full in find the shortest and best path in the network.


Routing Technique Administrator Distance
Connected Interface 0
Static Route 1
EIGRP Summary Route 5
External BGP 20
Internal EIGRP 90
IGRP 100
OSPF 110
ISIS 115
RIP 120
EGP 140
ODR 160
EXTENAL EIGRP 170
INTERNAL BGP 200
UNKNOWN 255

Commonly used Port Number

Below are  the list of common protocol and their-more-or-less "standard" port number.(Ports are TCP unless otherwise noted.)


. DHCP :- Port 67 (UDP)
. DNS :- 53 (UDP or TCP)
. Echo:- Port 7
. FTP :- Port 21 (Data channel for active ftp:- 20)
. Gopher :- Port 70
. HTTP :- Port 80
. HTTPS:- Port 443
. IKE :- Port 500 (UDP)
. IMAP :- Port 143
. IMAP (SSL) :- Port 993
. POP3 :- Port 110
. POP3 (SSL) :- Port 995
. Remote Desktop (RDP) Terminal Service :- Port 3389
. Rtelnet :- Port 107
. SMTP :- Port 25
. SNMP :- Port 161
. SQL Server :- Port 1433
. SQL Probe :- Port 1434 (UDP)
. Telnet :- Port 23
. TFTP :- Port 69
. UUCP :- Port 540
. Whois :- Port 43

Friday, November 2, 2018

How to take backup of lotus notes


Path:- Go to C:\Program Files\IBM\Notes\Data


Important File For backup:-
 
1. Archive

2. Desktop8.ndk

3. Names

4. Name.id

Network issue:-After changed existing Net Gear and HP Switch to Dell N1148T-ON and Dell N1124T-ON

I want to discuss about network issue

After changed existing Net Gear and HP Switch to Dell N1148T-ON and  Dell N1124T-ON everything is working fine but my printer (Cannon MF220) and DVR not working and also not able to ping,
As we checked that particular port and cable its working perfectly fine.

1st Step:- Check that particular port.

Connect one laptop with that particular port and check its working or not.

Solutions:- Change port setting auto negotiate to 100 MB.

Delete Printer Drivers

The problem can be caused by printer drivers. So you can try to remove the drivers and install them again.


Follow steps below:

1. Press Win+R (Windows logo key and R key) at the same time. A Run dialog box will open.

2. Type printmanagement.msc in the run box and click OK button.


3. In the left pane, click All Drivers.


 4. In the right pane, right-click on the printer driver and click Delete on the pop-up menu.


If you see more than one printer driver names, repeat steps above to remove them one by one.

5. Add the printer again.


Create a New Local Port for Printer

Follow these steps:

1. Open Control Panel.

2. View by Large icons, click Devices and Printers.


3. Click Add a printer at the top of the window. Note: To continue, you need to login to the computer as an administrator.


4. Select Add a network, wireless or Bluetooth printer.


5. Select Create a new port, change the “Type of port” to Local Port then click Next button.


6. Enter a port name in the box. The port name is the printer’s address. The address format is \\IP address or the Computer Name\Printer’s Name (refer to the following screen).  Then click OK button.


7. Select the printer model from the directory and click Next button.


8. Follow the rest on-screen instructions to finish adding the printer.


Windows Cannot Connect to the Printer Issue

Hi Guys, I hope you all doing great.

Help me to do famous this blog with sharing and you also can donate a bit for us.

Whenever you are trying to add a network shared printer, if you receive message “Windows cannot connect to the printer.”(commonly in Windows 7),. You can use solutions in this post to fix the problem. Each solution has been reported to be useful. So try all of them until you have the problem fixed.
The error would appear with a specific error code like 0x0000007e. The most common error codes are as follows:


Windows Cannot Connect to the Printer – Operation Failed with Error 0x00000002

Windows Cannot Connect to the Printer – Operation Failed with Error 0x0000007a

Solution  1:- Restart Printer Spooler Service
Solution  2:- Create New Local Port
Solution  3:- Delete Printer Driver
Solution  4:- Copy “mscms.dll” Manually
Solution  5:- Delete a Subkey


Fix a network printer showing as offline in Windows 7, 8 or 10


Hi Guys, I hope you all doing great.

Help me to do famous this blog with sharing and you also can donate a bit for us.
 
As we see some time network printer showing offline:-but where in other machines on the network can access it fine. I originally thought it would be an printer driver issue, but it turned out not to be anything to do with that. In fact, the solution was far easy – but also slightly different.
In Windows by it self automatically enables SNMP support for network printers, and if it can’t get a response to a SNMP message then it assumes the printer is offline. SNMP (Simple Network Management Protocol) and is a way of getting information from network devices (such as routers, switches, servers and printers), mainly for the purposes of finding out if there are any problems with the devices. A number of networked printers implement SNMP, and will respond to SNMP queries with information, but some don’t. My printer (Cannon MF220) is one of the ones that doesn’t implement it – so of course window will never get a response to a SNMP message. The result of which is that the printer will start showing as offline at a seemingly random time because window has just sent a SNMP message to it, and it hasn’t responded.
Apparently there is a simple way to fix this – and it just involves telling window not to try and communicate with the printer via SNMP. Simply right-click on the printer in the Printers window, choose the Ports tab, and select Configure Port. At the bottom you will see a checkbox saying something like SNMP Status Enable. Untick that, and the printer should start showing as online again.
That should be it…but here are a few other tips/observations from people who’ve commented on this post:
  • This has been found to work on a variety of versions of Windows including
    • Windows 7
    • Windows 8
    • Windows 8.1
    • Windows 10
    • Windows Server 2003
    • Windows Server 2008
    • Windows Server 2012
    • Window Server 2016
  • You could need to be logged in as an administrator before you can change the SNMP status
  • If you’re running Windows 8 then this could be the problem instead.
  • If you find that this solves it for a bit but it keeps going offline again then editing the registry at HKEY_LOCAL_MACHINE\SYSTEM\CurrentControlSet\Control\Print and adding a new DWORD called SNMPLegacy with the value 1 and restarting may solve it.
  • The issue can be caused even when the printer does support SNMP, but somehow the SNMP communications aren’t getting through – for example, due to a firewall or port configuration issue somewhere on the network.

Restart Print Spooler Service

Follow steps below to stop Print Spooler service then start it again.


1. Press Win+R (Windows logo key and R key) at the same time. A Run dialog box will open.

2. Type services.msc in the run box and  click OK button.


3. In the Name list, locate and double-click on service Print Spooler.


3. Under Service status, click Stop button.


 4. Click Start button to start the service again.


5. Click OK button.

After that, add the printer again and see if the problem persists.


Delete Printer Driver

The problem can be caused by printer drivers. So you can try to remove the drivers and install them again.

Follow steps below:

1. Press Win+R (Windows logo key and R key) at the same time. A Run dialog box will open.

2. Type printmanagement.msc in the run box and click OK button.


3. In the left pane, click All Drivers.


4. In the right pane, right-click on the printer driver and click Delete on the pop-up menu.


If you see more than one printer driver names, repeat steps above to remove them one by one.

5. Add the printer again.

Copy “mscms.dll” Manually for Printer

1. Open C:\Windows\system32 and find the file “mscms.dll“.


2. Copy the file toe the following path:

C:\windows\system32\spool\drivers\x64\3\ if you are using 64-bit windows

C:\windows\system32\spool\drivers\w32x86\3\ if you are using 32-bit windows

3. Try to connect to the printer again.

Delete a Subkey

Modifying registry keys incorrectly may cause serious system problems. So before you get started, it is recommended that you back up the registry key so you can restore it in case any problems occurs.


1. Stop Print Spooler service. (refer steps in Solution 1 to stop the service)

2. Press Win + R (Windows logo key and R key) at the same time. A Run dialog box will open.

3. Type regedit in the run box and click OK button.


4. Expand HKEY_LOCAL_MACHINE\SOFTWARE\Microsoft\Windows NT\CurrentVersion\Print\Providers\Client Side Rendering Print Provider. Right-click on Client Side Rendering Print Provider and select Delete.

5. Start the Print Spooler service.

6. Reboot your computer and try to add the computer again.

Hope the solutions here will help you fix the printer not connecting issue.

Unable to sign-in to Office 2016 desktop apps. Sign-in disappears after entering Office 365 account email address.

Hi,

I hope you all guys doing great.

Same issue currently running with us after changed window password outlook need password but after entered id then password popup vanish within in second.

Already tried so many things here is the list.

1. Deleted all password from Credential manager.

2. Delete all junk file through temp, %temp% , recent & prefetch.

3. Scanned system from command prompt and MCAfee.

4. Reinstalled office 365 after deleted each and every file relate to office 365.

5. Reset PC Settings with keep my data in window 10.

Now same thing happening with all office 365 product like MS word, MS excel etc., and rather then this in my computer everything is working very smoothly.

Note:- same id working with another computer and web mail too.

Any quick solution for this?

Solution:-

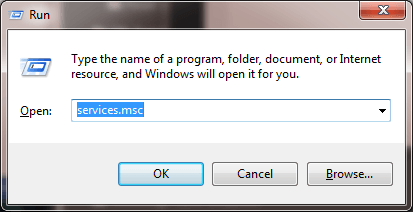
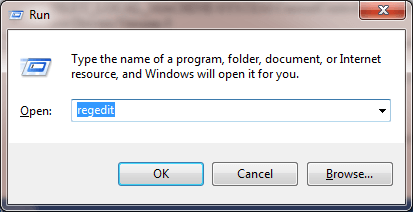
Go to the registry editor (Win+R; regedit)

go to HKEY_CURRENT_USER -> Software -> Microsoft ->Office -> 16.0 ->Common -> Identity

Inside "Identity", create a new REG_DWORD value called "EnableADAL" and leave the value at 0

Restart the PC and try again to login from Office 2016. In my case, the logon screen was now different and it worked perfectly.


Thanks !